banner


How To Repair The Charger Port On A Nextbook Tablet

  • Insert the plastic opening tool into the middle of the bottom edge of the device. The tool should be inserted within the seam between the back and front covers. Slide the opening tool to the right and slowly continue to separate the back cover from the device. Avoid prying on the buttons, as they are easily damaged.

    • Insert the plastic opening tool into the centre of the bottom border of the device. The tool should be inserted within the seam between the back and front covers.

    • Slide the opening tool to the right and slowly keep to separate the back embrace from the device.

    • Avoid prying on the buttons, as they are hands damaged.

  • Pull the cover off of the device once about three quarters  of the cover has been pried open using the plastic opening tool.

    • Pull the comprehend off of the device once about iii quarters of the comprehend has been pried open using the plastic opening tool.

  • Remove masking tape from the battery.

    • Remove masking tape from the battery.

  • Pry the battery from the base using the nylon spudger and move it away from the motherboard. Handle the battery with care to avoid damaging it. Handle the battery with care to avoid damaging it.

    • Pry the battery from the base of operations using the nylon spudger and move information technology away from the motherboard.

    • Handle the battery with care to avoid damaging information technology.

  • De-solder the three contact points and remove the battery. See the following guide for instructions on how to solder. How To Solder and Desolder Connections Use caution when operating the soldering iron.

    • De-solder the three contact points and remove the battery.

    • See the following guide for instructions on how to solder. How To Solder and Desolder Connections

    • Use circumspection when operating the soldering atomic number 26.

  • Remove the two ZIF connectors attached to the motherboard by flipping up the black tabs before pulling the ribbon cable away. Only use a fingernail or nylon spudger to flip up the retaining flap. Using metal tools may damage delicate components. Only use a fingernail or nylon spudger to flip up the retaining flap. Using metal tools may damage delicate components.

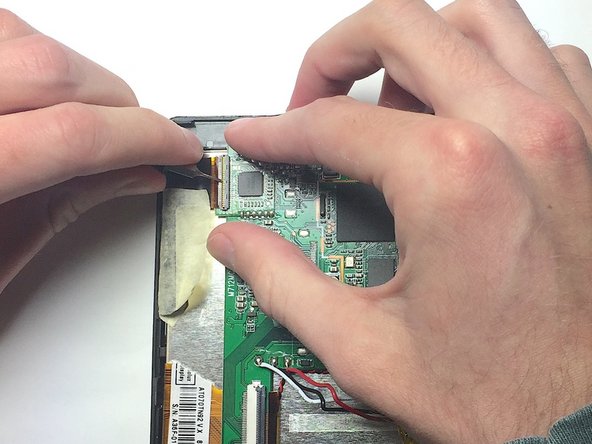
    • Remove the two ZIF connectors attached to the motherboard by flipping upwardly the black tabs earlier pulling the ribbon cablevision away.

    • But use a fingernail or nylon spudger to flip up the retaining flap. Using metallic tools may damage frail components.

  • Use the nut driver and J00 bit to remove the three 4 mm screws.

    • Use the nut driver and J00 scrap to remove the three four mm screws.

  • Peel back metal tape that is hiding the auxiliary port wires. Remove tape that is holding the speaker wires in place. Lift up on the motherboard to release it from the tablet.

    • Peel back metal tape that is hiding the auxiliary port wires.

    • Remove tape that is property the speaker wires in place.

    • Lift up on the motherboard to release information technology from the tablet.

  • Flip the motherboard over and locate the Micro USB port once the motherboard has been detached

    • Flip the motherboard over and locate the Micro USB port once the motherboard has been discrete

    • De-solder the three contact points and remove the port.

    • See the following guide for instructions on how to solder. How To Solder and Desolder Connections

    • Utilise circumspection when operating the soldering iron.

  • Source: https://www.ifixit.com/Guide/Nextbook+Premium+7SE+Charging+Port+Replacement/74561

    Posted by: mahoneygiver1956.blogspot.com

    Related Posts

    0 Response to "How To Repair The Charger Port On A Nextbook Tablet"

    Post a Comment

    Iklan Atas Artikel

    Iklan Tengah Artikel 1

    Iklan Tengah Artikel 2

    Iklan Bawah Artikel